
Building a dbt work environment for analytics with devcontainers
We absolutely love dbt at TripActions, for all the capability it affords our team for data transformation, lineage and documetnation management, and testing. As a lead, one of the things I appreciate most is it empowers everyone to produce and deploy production grade code with confidence.
However, the technical requirements for the work environment continue to get more complex, and many analysts would prefer to focus on analytics, getting into the data, building models, and gathering insights. Yet today, they are asked to have proficiency in:
- Git + CI/CD
- Command line actions in the terminal
- Virtual environments
- Package and version management (even dbt requires this!)
Add into that all the different tools available to enrich either the terminal or the IDE, and the configuration of those tools, and it becomes overwhelming for everyone. This led us to build a common devcontainer for use by every analyst.
 |
|---|
| Our standard dev environment. Shown here: Todo tree (full view of todos), rich ZSH experience, git lens/history, and dbt macro autocomplete |
Enter dev containers
Since we have standardized our team around VS Code as our preferred editor, we can take advantage of dev containers, a standardized way for us to build the development environment for our team. In short, dev containers are standardized docker and VS Code configurations built at a repository level which ensure that whenever a user is working in a repository, they can work with the same tooling. The benefits here are enormous:
- No more troubleshooting of issues, errors, etc. If something goes sideways, just rebuild the container!
- Version changes can be tested, pushed, and standardized across the group. Gone is saying “we’re upgrading to X version Y. Please follow these six steps”, now it’s as simple as “Please pull master and rebuild your container”
- Any enhancements to tooling, workflow, etc can be implemented group-wise at the same time. Every person works with the same best practices
- We can easily extend the container’s capabilities and add new CLI functionality to guide the analysts through their work
Configuring the dev container
Building a dev container consists of a minimum of two files:
- Dockerfile is the build file to generate the underlying container
- devcontainer.json contains the configuration for VS Code including extensions, settings/formatting, and what additional information should be passed over to the container during build
Additionally, we hav extended our core config a bit further to simplify life:
-
One time runs/edits:
- setup.sh is a one-time shell script that installs common fonts, copies keyfiles, creates environmental variable files, and basically guides the setup process to ensure the container works as expected
- .env is generated during the setup and contains a few key environmental variables each analyst has to define, notably snowflake username and role
-
Made available in the container. Wherever possible, we use symlinks from the repository into the proper location on the file system so the analyst can easily edit/adjust (as opposed to files copied into the container, which need to be edited locally or rely on container regeneration to make changes available):
- .p10k.zsh is our standard terminal configuration file to ensure every analyst has the same optimized zsh configuration
- profiles.yml is the dbt configuration file. Since we can update this during the container creation in the container, we can use a single standard
profiles.ymlfor the whole team - data_tools.ini is the local configuration file every developer has for secrets and credentials they might need in the course of development
Lastly, during setup we copy over two critical files into the repository, listed in .gitignore to prevent accidentally being checked in. Due to docker limitations, these files need to be in the repository in order to be available in the container:
- id_rsa is copied in so analysts can use git via SSH from the container
- snowflake.p8 is the snowflake key file we use for authentication
With all these files in place, we can consistently generate an environment which always works for each analyst and lets them work without limitations
Dockerfile: Building a dbt development powerhouse container
There are a number of utilities that are helpful in running dbt, so we try to load all of them into the container so everyone is working with the best tools. One thing you’ll note is that we intentionally run the container as root at all times; since it can be rebuilt at any moment and does not risk the underlying system, the risks of breaking it are more than offset by the easy of never needing to ask someone to use sudo to do something. Tools just work
In order of implementation:
Pyenv
Pyenv is a powerhouse for building and managing python virtual environments. We build several different virtual environments to keep things clean:
- dbt: dbt should run from its own environment
- data_etl: our requirements for our ETL project; also, our default environment
- toolbox: our CLI for managing documentation, VMs for data science, and testing
RUN git clone https://github.com/pyenv/pyenv.git /root/.pyenv
ENV PYENV_ROOT="/root/.pyenv"
ENV PATH="$PYENV_ROOT/bin:$PATH"
RUN git clone https://github.com/pyenv/pyenv-virtualenv.git $(pyenv root)/plugins/pyenv-virtualenv

ENV VENVS=/root/.pyenv/versions/
ENV PIP_NO_CACHE_DIR=1
RUN for i in data_etl data_cli_toolbox dbt; do python -m venv ${VENVS}${i}; done
RUN for i in data_etl data_cli_toolbox dbt; do ${VENVS}${i}/bin/pip install --upgrade pip  wheel setuptools; done

# More setup follows for each environment here
With pyenv installed, almost all conflicts are solved with python versions, configuration, etc
Bat
Bat is a cat replacement that adds syntax highlighting and formatting to text files in the terminal, and pairs powerfully with fzf-dbt to create a more usable interface for file exploration
RUN wget https://github.com/sharkdp/bat/releases/download/v0.19.0/bat_0.19.0_arm64.deb -O /tmp/bat.deb
RUN dpkg -i /tmp/bat.deb; exit 0
fzf-dbt
fzf-dbt allows easy model search and selection by name, selector, or tag, along with SQL preview in the terminal. This makes model selection much easier
RUN git clone --depth 1 https://github.com/junegunn/fzf.git /root/.fzf
RUN /root/.fzf/install --key-bindings --completion --update-rc

ENV FZF_DBT_PATH=/root/.fzf-dbt/fzf-dbt.sh
ENV FZF_DBT_DIR=/root/.fzf-dbt
RUN mkdir -p /root/.fzf-dbt
RUN curl -L https://raw.githubusercontent.com/Infused-Insight/fzf-dbt/main/src/fzf_dbt.sh > /root/.fzf-dbt/fzf-dbt.sh
ENV FZF_DBT_PREVIEW_CMD="cat {}"
ENV FZF_DBT_HEIGHT=80%
ENV FZF_DBT_PREVIEW_CMD='bat --theme OneHalfLight --color=always --style=numbers {}'
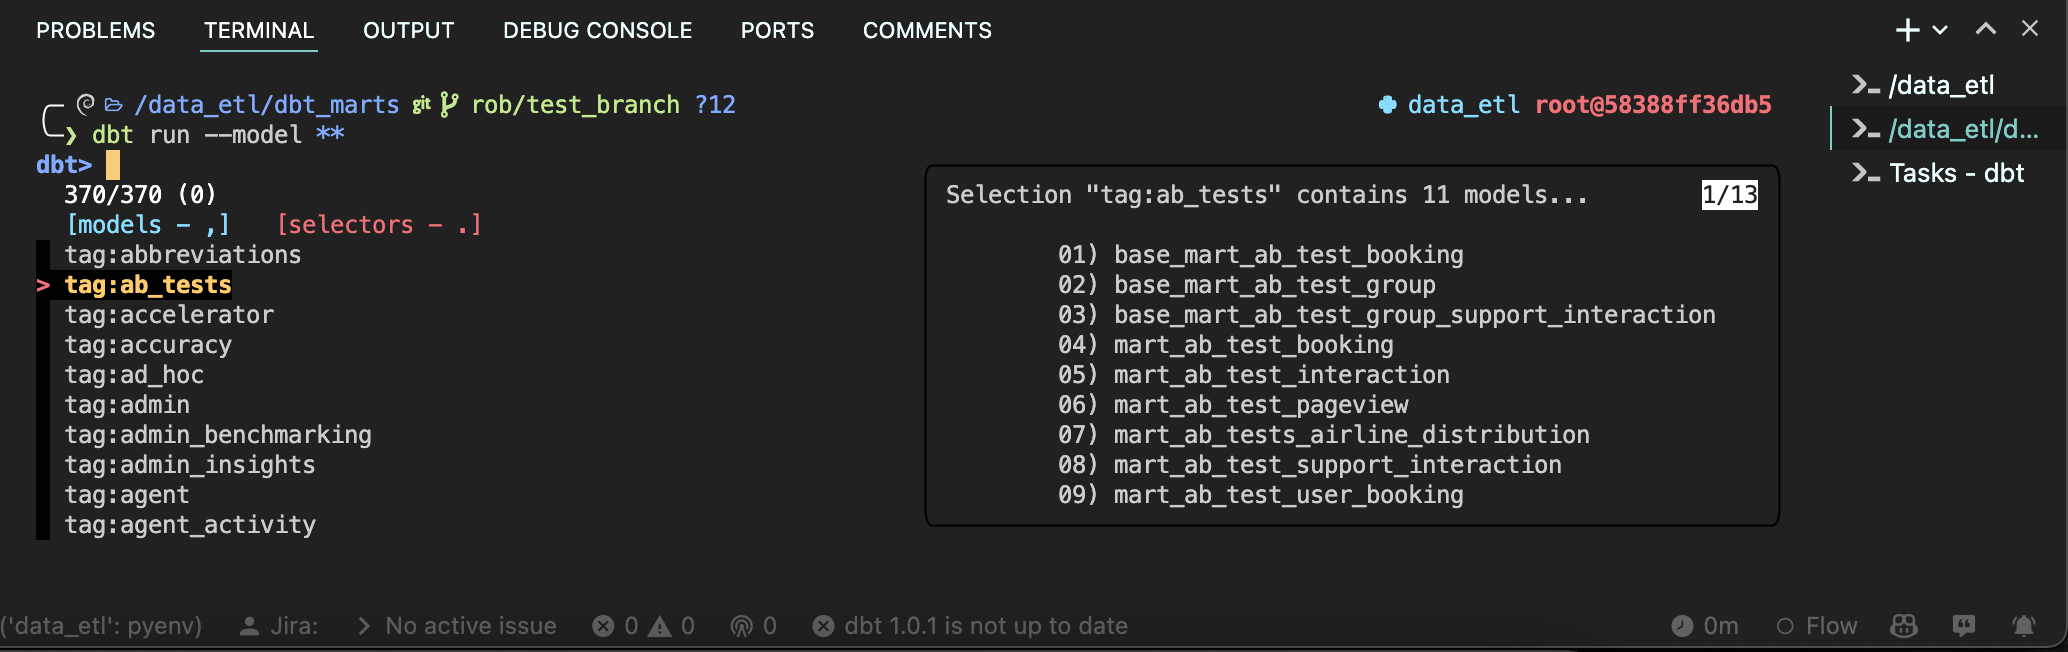 |
|---|
| fzf-dbt plus bat: Using selectors to see available models |
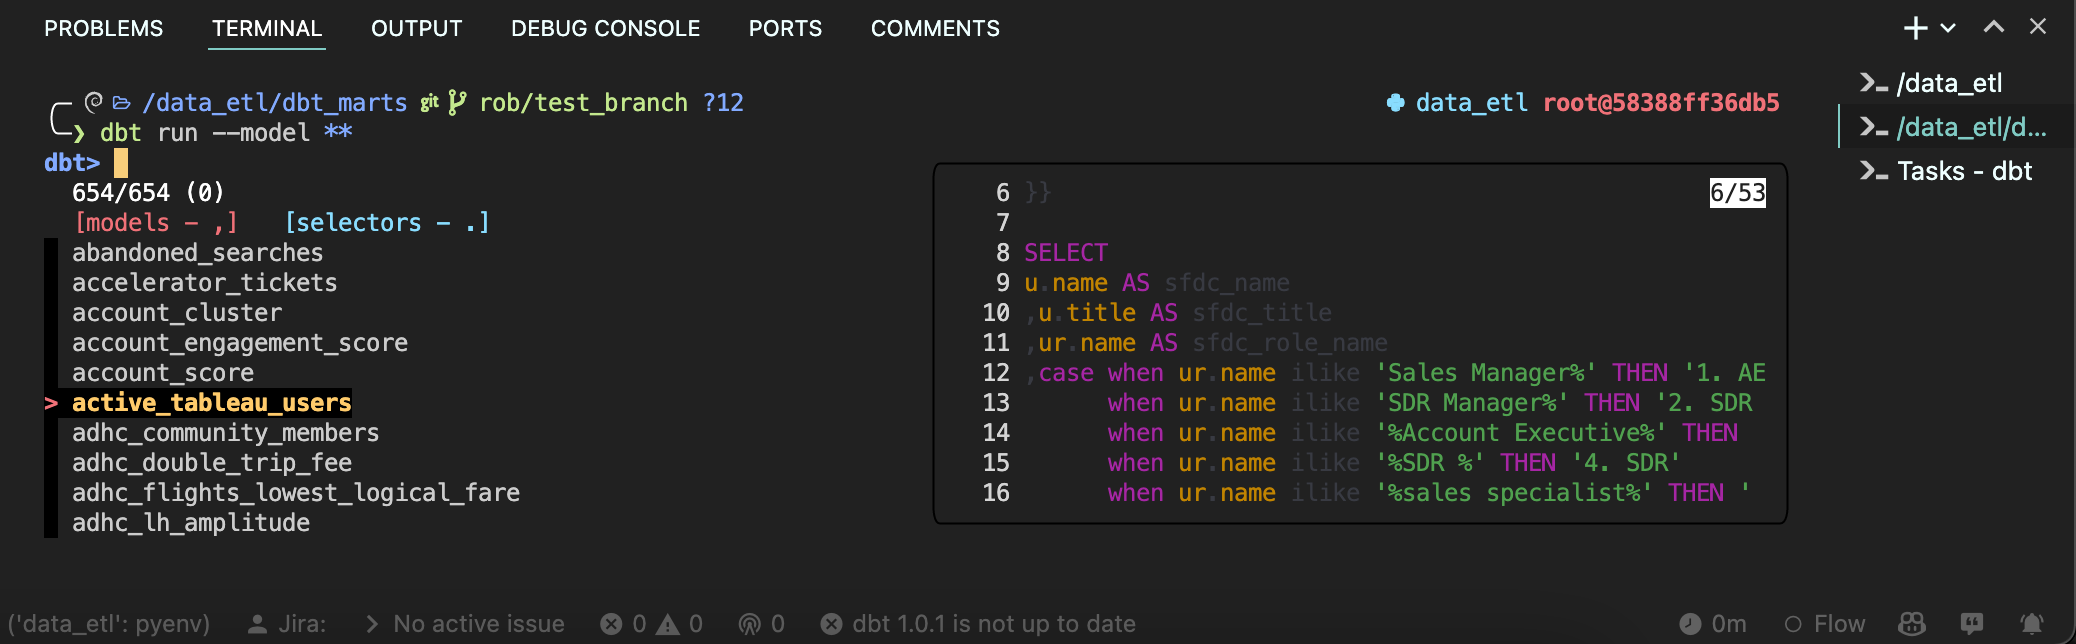 |
|---|
| fzf-dbt plus bat: Previewing a single model during selection |
Navi
Navi is a fantastic utility for adding guidance and easy documentation to the command line. For many joining our team, this is the first time they’ve had to work in this type of technical environment and memorizing all the commands can be tricky; Navi allows folks to quickly and easily get a guided flow through the terminal and significantly lowers the ramp up speed
RUN BIN_DIR=/usr/bin curl -sL https://raw.githubusercontent.com/denisidoro/navi/master/scripts/install | bash
RUN git clone https://github.com/denisidoro/cheats.git /root/.local/share/navi/cheats/cheats
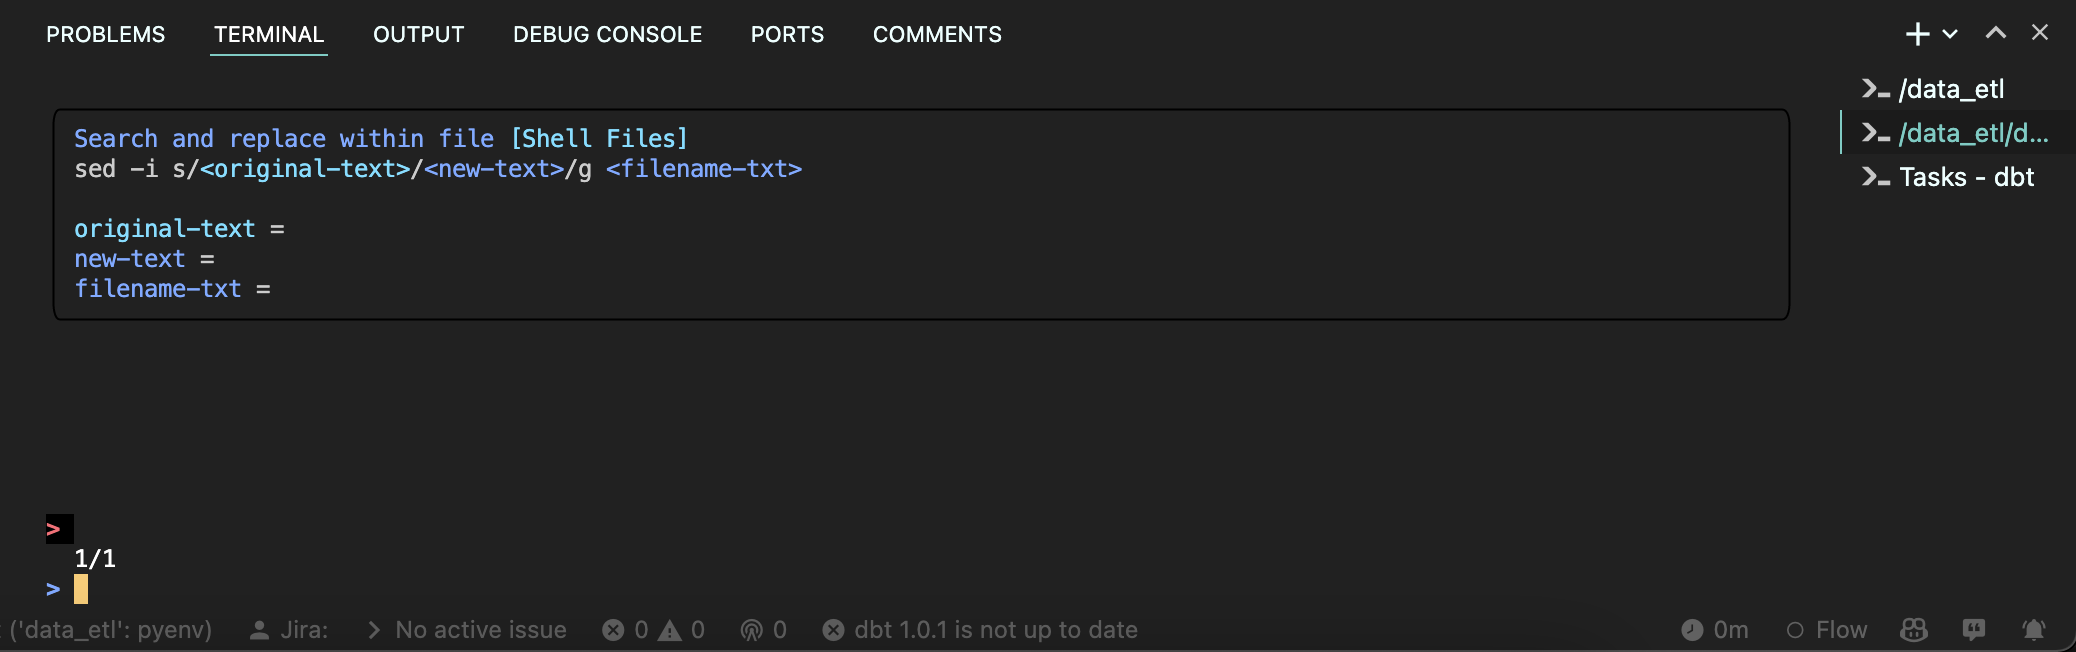 |
|---|
| Navi: Guiding someone through sed |
ZSH
ZSH is an amazing replacement for the default terminal, adding a ton of base capability; when it is paired with a good theme and oh-my-zsh, it becomes a powerhouse for the command line. We use zsh-in-docker to handle the installation and the following configuration and extensions:
- Powerlevel 10k to build an easy to use, informative terminal
- Autocompletion, including dbt autocomplete and bash autocomplete
- Directory level history
- Pretty JSON tools
- Colored man pages for better documentation
- z to easily navigate to common directories
- Auto suggestion, completions, and syntax highlighting to lower the odds of someone getting stuck trying to use a bad command
Additionally, we add a number of useful aliases for our team, including:
- dbt_fix: loop all dbt projects, clean them, and re-install packages
- Shortcuts to commonly used subdirectories
- Abbreviated commands, ex
gloginstead ofgit log --graph --decorate --abbrev-commit
The beautiful thing with doing all of this via setup is that we can load everything in a single command and ensure everyone is provisioned, ex:
RUN sh -c "$(wget -O- https://github.com/deluan/zsh-in-docker/releases/download/v1.1.2/zsh-in-docker.sh)" -- \
    -t "powerlevel10k/powerlevel10k" \
    -a "source /root/.dbt-completion.bash" \
    -a 'function dbt_fix() {for i in dbt_dwh dbt_marts; do cd /data_etl/$i && dbt clean && dbt deps && dbt compile; done}' \
    -p colored-man-pages \
    -p https://github.com/zsh-users/zsh-autosuggestions

ENV SHELL /usr/bin/zsh
(ours is a bit more extensive than this)
(git) diff so fancy
We also install diff so fancy and apply its recommended formatting. This enormously improves the git diff experience and makes reviewing changes and impact easier
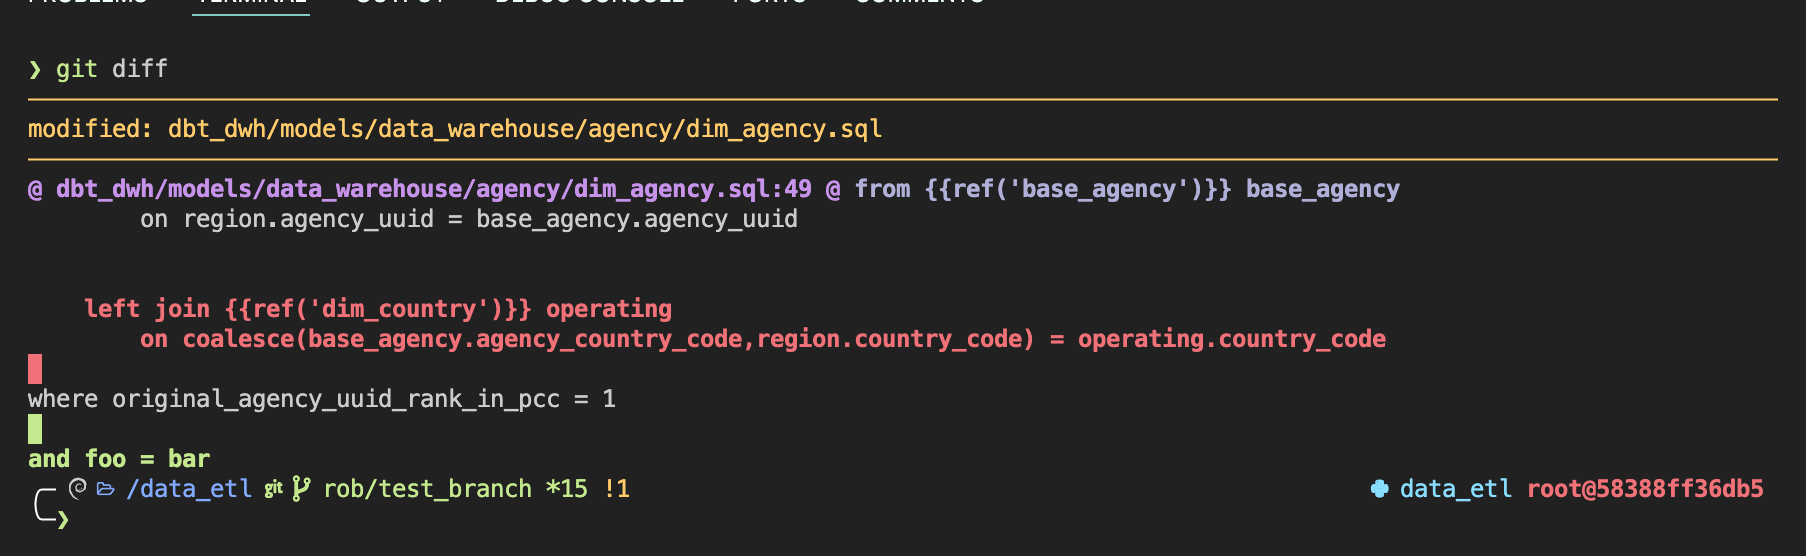 |
|---|
| Diff so fancy: Easier to read git diffs |
Color LS
Lastly, we replace ls with color ls, which adds color coding and significant iconography to make file management easier
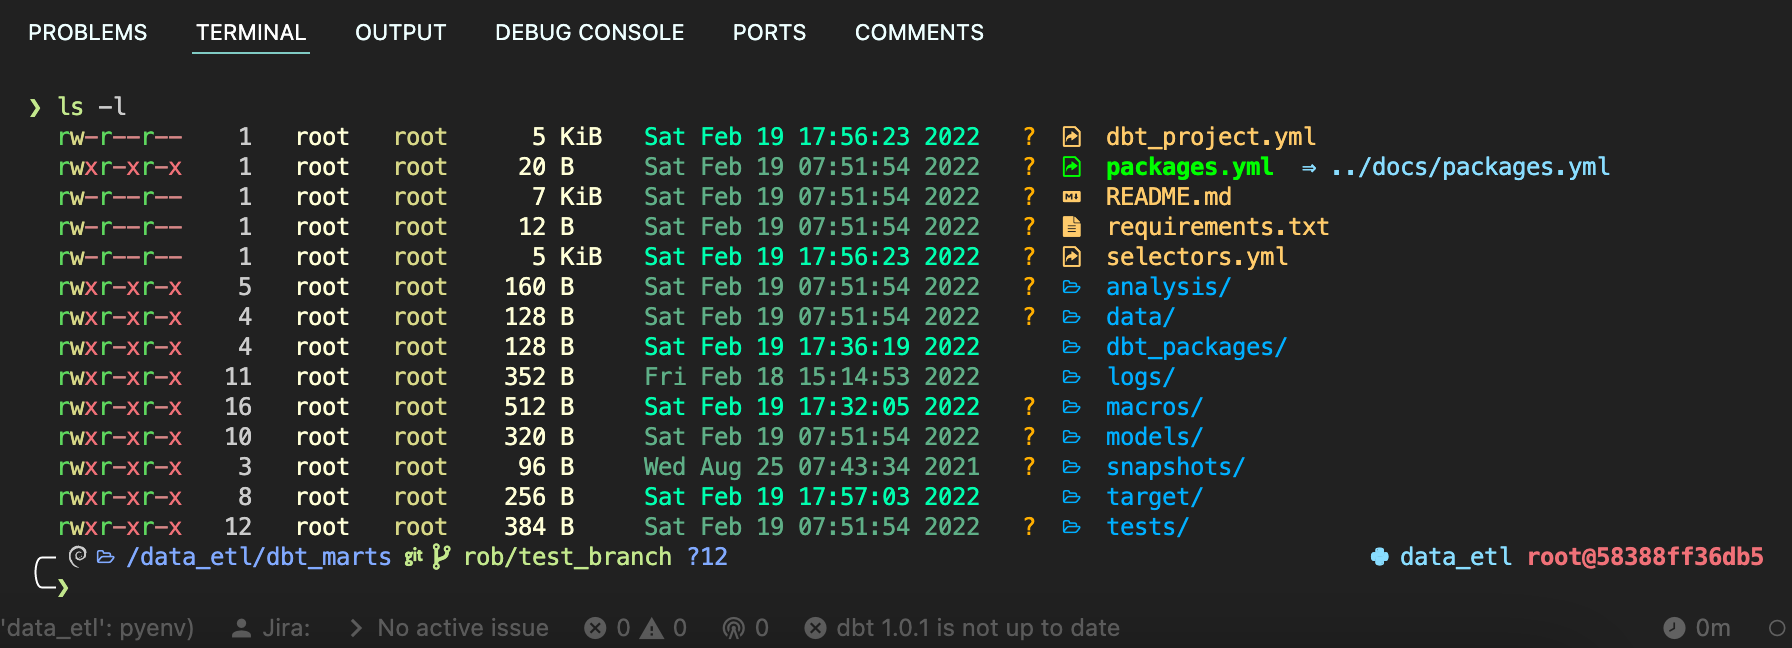 |
|---|
| Color LS: Clear visibility of file types plus git status |
Configuring dbt profiles.yml
To set up dbt to work, we need to do a few steps:
- Copy the
profiles.ymlfile from the repo to~/.dbt/profiles.yml - Overwrite the variables with the values from
.env
Afterwards, dbt works as expected for every user. We do not use passwords, only key based auth, so we can consistently reference the same key file path for authentication
Configuring VS Code
Compared to configuring the container, setting up VS Code for effective dbt development is quite simple. There are three main areas of configuration we concern ourselves with to set up an effective environment:
- Extensions allow us to select and enable the best-in-class additions to VS Code which make it an incredible IDE for all types of development
- Settings define the configuration and internal mechanics of VS Code, and are critical for A) enforcing consistent development and B) ensuring everything works as expected
- Run Args are useful additions to the docker build process which allow us to make the container richer, for example by passing through certain services
Extensions
There are a number of incredible extensions available to power an analyst’s work, we have aligned around the following:
- Python
- Python is a baseline package for a number of other useful tools
- Pylance further extends Python development capabilities and significantly improves the quality and speed of development
- Github Copilot is an incredible tool for accelerating the coding part of the creation process, allowing developers to focus more on architecture and ideation
- dbt
- Better Jinja is an essential for working with jinja templated code like dbt SQL
- vscode-dbt adds a number of useful macros and time saving shortcuts when editing jinja SQL and is (for us) a “must have”
- vscode-dbt-power-user provides go to model, upstream/downstream visibility, and ease of viewing the compiled SQL
- Formatting
- Trailing Spaces One of the most common issues we see with hand-coded SQL are trailing spaces; this extension effectively eliminates them (we still check on a pre-commit hook though!)
- vscode-yaml Working in dbt means writing a lot of yaml; this extension makes that easier to do well
- Developer tools
- We have also standardized the visual formatting of VS Code with the material theme, material icons, and material product icons. While not essential, it does make collaboration a bit easier if IDEs look consistent
Settings
With the extensions selected, a few settings should always be present to make everything work nicely. Of most important, our dbt tools expect jinja-sql, not SQL, formatted files:
    "files.associations": {
      "*.sql": "jinja-sql",
      "*.yaml": "jinja-yaml",
      "*.yml": "jinja-yaml",
      "*.md": "jinja-md"
    },
    "editor.quickSuggestions": {
      "strings": true
    }
Next, we want our dev tools to work consistently and enforce standards:
    "python.linting.enabled": true,
    "python.linting.pylintEnabled": true,
    "python.formatting.provider": "black",
    "python.linting.pycodestyleEnabled": true,
    "python.formatting.blackPath": "/root/.pyenv/shims/black",
    "python.formatting.blackArgs": [
      "--line-length",
      "100"
    ],
    "git.autofetch": true,
    "python.languageServer": "Pylance",
    "github.copilot.enable": {
      "*": true,
      "yaml": true,
      "plaintext": false,
      "markdown": false
    },
Lastly, we enforce consistent visualization. This is potentially the most controversial as it is what people feel the most, but as 80% of users just use the default, it makes more sense to improve things for 80% and ask the others to adapt slightly to a standard then to leave this as free-for-all. We also can tweak the common visuals based on feedback to improve usability:
    "editor.fontFamily": "MesloLGS NF",
    "terminal.integrated.fontWeight": "normal",
    "terminal.integrated.fontWeightBold": "bold",
    "terminal.integrated.fontFamily": "MesloLGS NF",
    "terminal.integrated.rightClickBehavior": "copyPaste",
    "workbench.iconTheme": "material-icon-theme",
    "workbench.colorTheme": "Material Theme Darker",
    "workbench.productIconTheme": "material-product-icons",
    "workbench.colorCustomizations": {
      "editorGroupHeader.tabsBorder": "#0F6C8C",
      "tab.activeBackground": "#804d00"
    },
    "editor.fontLigatures": true,
    "editor.tokenColorCustomizations": {
      "comments": "#76eec6"
    },
Conclusion
Dev containers are an incredible way to make your data team more productive, capable, and consistent, and to lower the amount of troubleshooting folks need to do. Given the time invested to set them up (2-3 hours to build and configure, the same again in optimization, ~15 minutes per user to roll out) and the benefits, my only regret is that we didn’t transition to them sooner.